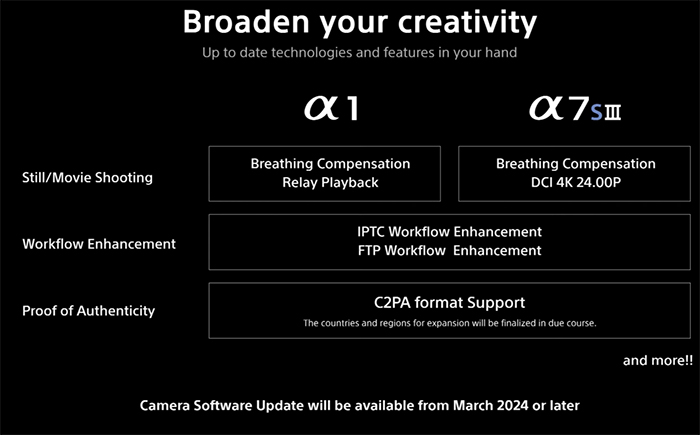
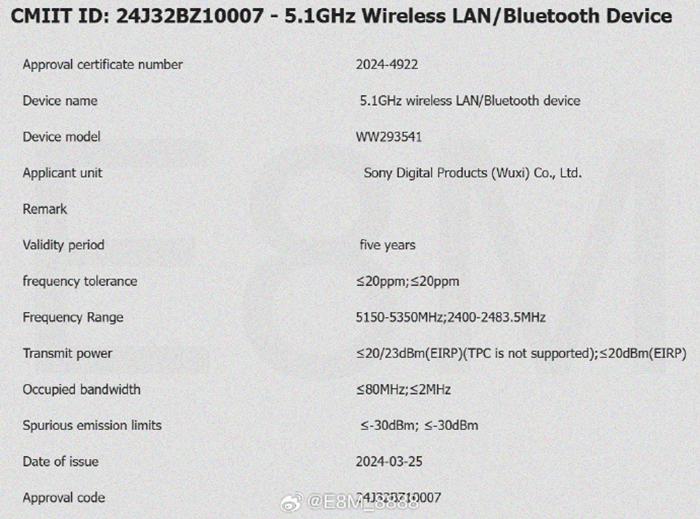
Macro Photography on a budget: Part Two (By Menachem Goldstein)

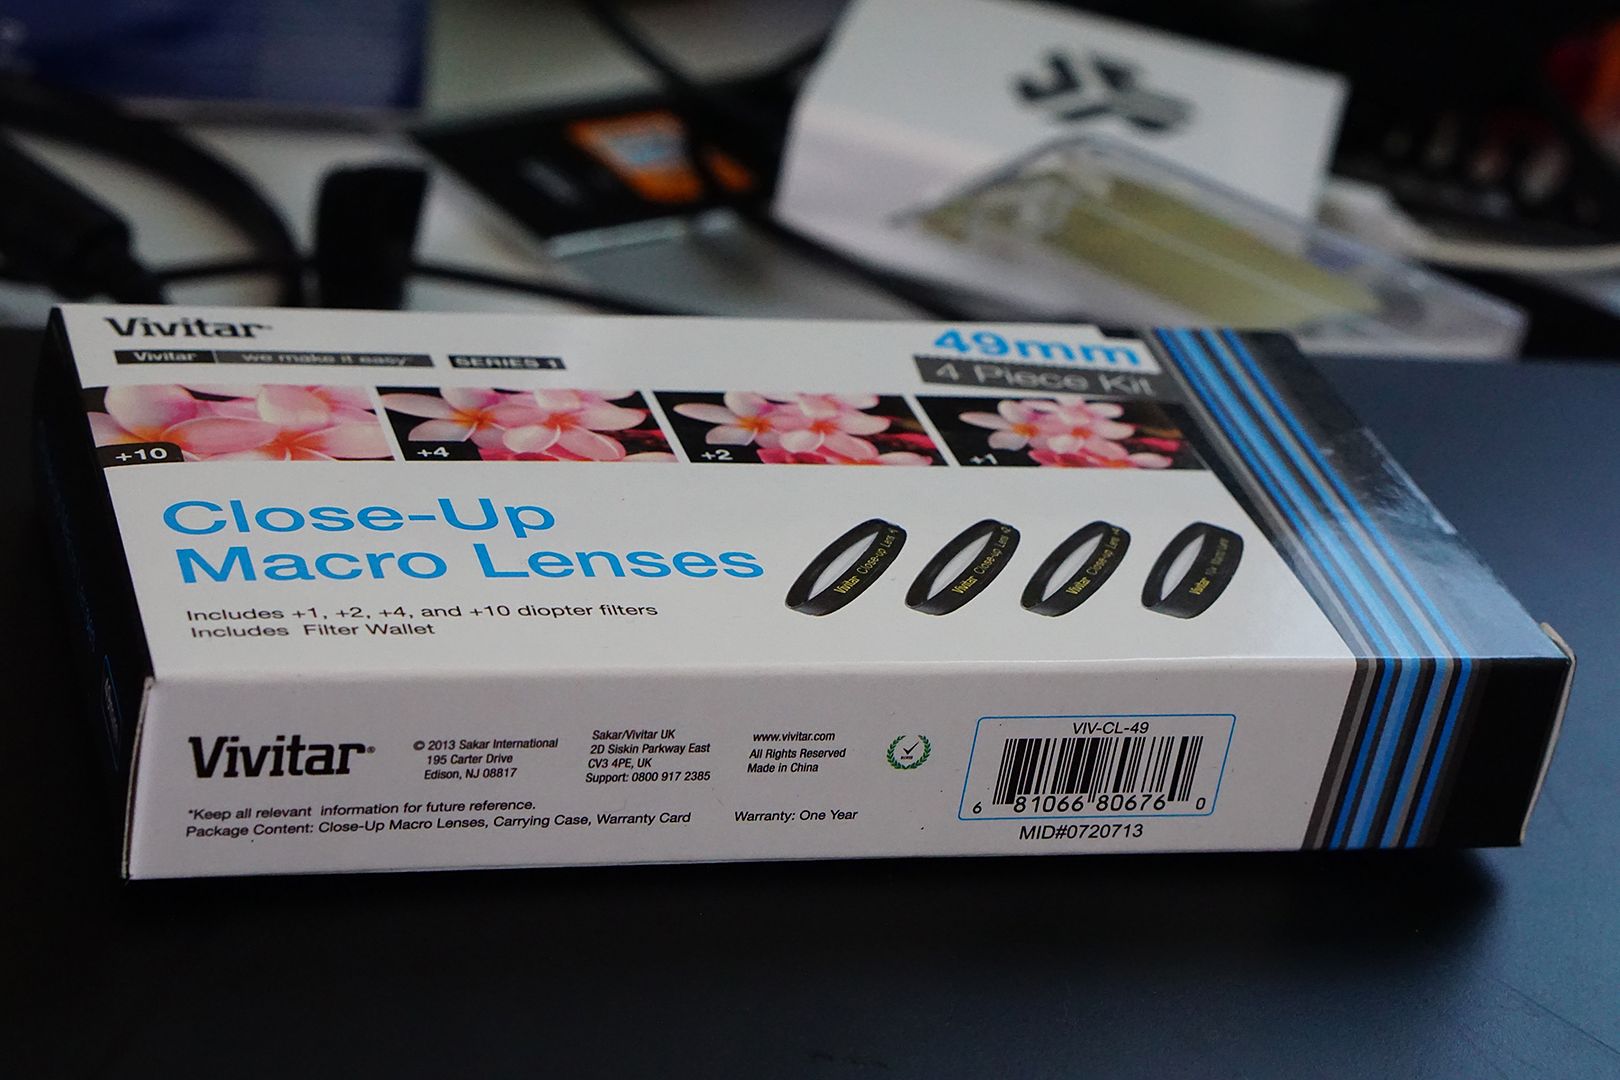
Vivitar 49mm Close Up Lens Set (+1, +2, +4, +10)
SAR note: This is a guest post. If you want to write an article for SAR contact me (Andrea) at sonyalpharumors@gmail.com. Thanks!
———————-
Macro Photography on a budget: Part Two (By Menachem Goldstein)
Exciting News: I have just launched my own review site, thewatcha.com, and my request to plug this announcement into my review has been graciously accepted by the wonderful staff behind sonyalpharumors.com . I will always be thankful to this site for giving me a chance to stretch my legs in the art of reviewing, and I hope that my new site will allow me to see just how far I can run. It is likely that I will still collaborate with sonyalpharumors in the future, so I hope that this will not be taken as a goodbye!
Thanks again to Andrea and the wonderful community of readers that make writing reviews something that I keep on coming back to.
Introduction: Context
For the second part in my short series on budget macro options for the E series, I have opted for an even cheaper option, the $12 Vivitar macro filter (aka diopter) kit. The optical principle that is behind the concept of a macro filter is simple and promising, and is present in an identical function in convex corrective vision lenses (known to the less engineeringly inclined as glasses, and more specifically in our context, reading glasses). The concept is a simple one: most lenses have a minimum focusing distance which precludes their use as a macro lens, as getting close enough to the subject to achieve a magnification ratio of 1:1 would be far inside that minimum focusing distance. Humans occasionally have a similar limitation, in a condition known as hyperopia, or farsightedness. In both of the above scenarios, a common solution has been devised- the use of a single convex optical element ( I have learned from comments on previous articles that it is proper to make mention of the full venue of options in this context, and not to talk in absolutes when there are options that are not being covered. To this end, I will make mention of achromatic doublet style macro filters, which in fact contain two optical elements, or even designs with more elements, that are also available. I don’t have any of these those, and am therefore not reviewing it. Was that good enough, Vlad, Vivex, and others?) designed to bring the focus range closer to the lens. This element, which can be mounted on the traditional filter threads present on almost all interchangeable lenses, presents a convenient way for users to adopt lenses for macro use.
While convenient, a common criticism of these filters is the deleterious effect that they are reported to have on image quality (IQ). The glass used for these filters is rarely of the same optical quality as the lens itself, and if it is, then it is priced out of the reach of the budget consumer- or at least that is the accepted common knowledge (more on this later). The advantages of these filters are usually said to be a generally low price, as well as convenience; the mounting of a filter thread is much easier than the dismounting of the lens itself that is necessary for the installation of macro tubes, and the procedure also negates any of the possible sensor-dust risks that arise when dismounting a lens.
As an aside, I would like to add a note of potential caution to prospective buyers of these filters. I am not certain that I am accurate here, as I do not have any source for this. I would like to point out a potential inaccuracy in some forums that I have read, and if it is accurate, then I will have performed a public service in publicizing it. As I cannot edit these articles after they are published, I encourage readers to read the comments section; there are individuals with more experience and knowledge than me, and I hope that they will provide their valuable insight on this. (I’m looking to you again, Vivex, Vlad, Animalsbybarry, and crew) It seems that some people feel that, in the name of budgetary expediency, it is advisable to purchase one set of macro filters for a large filter thread size, and then to purchase step down rings to fit smaller sized lens threads. Although I do agree with this proposition in regard to filters that modify on a two dimensional plane (color filters, neutral density filters, polarizing filters) I cannot agree in the case of filters that alter a photographs in three dimensions (such as a macro filter). It would seem to me that the convex curve of a macro filter would be suitable only for a lens of a comparable size. If a larger filter were to be used, then the middle of the lens, which is deeper and does not offer the curvature that is inherent in the filter’s premise, will provide degraded effect in the function of the filter, and possibly in IQ as well. I therefore recommend investing in a separate set of filter for each of your lenses filter sizes.
First Impressions: Packaging
The vivitar lens filter set came in a reasonably well appointed packaging, especially considering its price. The packaging did not scream prestige or quality- but it didn’t have to. The box itself is of no consequence, however, so I will not dwell on it, but I will spend some time on the packaging that was contained within the box: a convenient polyester four-pocketed carrying case, with a faux felt backing. The case was certainly a thoughtful addition to the package; not only is it useful, but it also sends a message of quality- that the manufacturer is not only worried about you buying the product, but using it as well. At first I was concerned that the coarse webbing that formed the front of the pouches would scratch the lens element, but after forcefully rubbing a macro filter against the surface, I found no visible trace of scratching on the lens element. The faux felt backing of the pouches were also non-scratching. Overall, then, I found this to be a thoughtful addition, which contrasted distinctly with the lack of any carrying case in the macro tubes package.
Quality:
The optical elements are made of glass, and the rings are made of metal. I think that the metal rings are an excellent value at this price point, and I applaud Vivitar’s choice of material. I think that it is important to use metal for threaded aplications, because plastic threads are generally prone to stripping if threaded improperly, whereas metal threads generally do not. I am well aware that there are metal alloys that are more pliable than silly putty, and i have had my fair share of experiences with them, but I am simply speaking to the general rule, to which there are definitely a great deal of exceptions. The point is, though, that the metal used in these filiters does not appear to be too cheap, and is therefore persuant to the generizaiton that I made. As a disclaimer, though, this judgement was made based on casual usage and the feeling in my hand, and not on any definitive testing. In short, I am impressed with the build quality, and I would have been pleased with this purchase even if I had spent three times the amount that I did on it, which is high praise by any measure.
The glass element is a topic that is more suitable for the section dealing with performance, so please refer to that section for more information.
Fit:
I found the fit of the filter to be exact, which is nothing less than expected for any lens filter. The filter rings screwed nicely into place, and there was no give or looseness on either side of the filter, even with three filters in place at once. Although i did feel some abrasiveness when screwing in the macro filters into other filters, or vice versa, I did not feel that this was significant enough to be detrimental to any equipment, but I felt it noteworthy nonetheless.
While we are on the subject of abrasiveness, I feel that this is an appropriate place to raise a concern that I did feel was relevant to the damage of other equipment. The ribbed edge on one side of the filter’s z axis (I don’t know how else to refer to this area), presumably made for ease of use when threading or unthreading the filter, has not been finished properly, resulting in coarse, abrasive edges that made me wary of contacting lens elements. I compared the ribbing to that found on my Hoya neutral density filter, and the ribbing on the Vivitar ring is significantly more abrasive. This oversight, while forgivable, is still significant, as the rest of the filter’s metal ring has been finished properly, and I would have prefered that Vivitar keep the smooth surfaces, rather than rib the edges as an underthought afterthought.

Performance:
We now arrive at the meat and potatoes of this review, the part that really matters to most. This is especially the case when we are discussing an accessory that contains optical lens elements, which means that if it does not perform properly, then it won’t matter how much your body or lens cost; your photos will be at the complete mercy of the accessory that you have attached to the end of them. Thankfully, though, I am pleased to report that this is another area in which the Vivitar performs well. The Image Quality (IQ) has been quite sharp to my eye, and I am definitely pleased with the results. I have been meaning to get a standards compliant sharpness testing subject, but I have not done so yet, so I am forced to rely on subjective estimations. These estimations speak well of the lens element, as they do not seem to introduce softness, chromatic aberration, loss of contrast, or any other undesirable characteristic into the image. I love flowers as much as I love photography (although my recent foray into indoor plant care ended in abject failure, so I love other’s flowers, as well as wild ones). These subjects, especially when shot in natural light, provide a multitude of opportunities for these deleterious effects to show up, and the fact that they didn’t, even with stacked macro filters, is impressive.
Speaking of using multiple filters, I did test out the use of multiple filters being used concurrently, and although I tried only a small number of combinations, I feel confident enough to extrapolate from those to other use cases.
I started with the +10 diopter, which produced fantastic results. The pictures were so crisp and sharp to my eye that I actually ended up walking around with this lens filter attached for a couple of days, and mostly focusing on macro (no pun intended, honest) shots during that time. If I wanted to take a shot without the filter, all I needed to do was unscrew it for the duration of those shots, and hold it in my other hand. This was much easier than switching out the macro tube extension in the field, which I am embarrassed to say I actually did several times.( I think that sometimes I just throw caution to the winds, and think that I am sticking it to a system somehow, but this is not a review of my psychological profile, so we won’t explore this topic further). The focusing with the +10 diopter was not amazing, but it was definitely more accurate than the macro tubes; it even got focus spot on about fifty percent of the time.

Of course, the next step after that was trying to go as far as I could (or as close as I could, depending on your perspective). As it happens, that comes out to +14 (10 + 4). With this combinaiton, you get maximum magnification, with no visible loss of sharpness, and only slight chromatic aberration (CA) as the price to be paid. If I tried to add anything else, even the +1 filter, I got a sharp fall-off in sharpness. I also simply had to try all of the lenses stacked, just to see what would happen- with the inevitable results: really soft pictures with very interesting bokeh, and I don’t mean that in a good way.
Moving back, I found the +1 filter to be extremely approachable (when the puns start coming…), with same results for the +2 filter as well. I also got a fine amount of use out of the +4, and I experimented with +4 and +2 stacked together, which also had fine results, but with minor chromatic aberrations. but I found my sweet spot to actually be the +10, which I found myself constantly coming back to. I really enjoyed the level of closeness that I could achieve, and I was never disappointed with the IQ.
Boiling down the lessons that I learnt from different combination experimentations, I found four rules to go by:
1) The higher the diopter value, the harder it will be to focus.
2) You can stack any two diopters, with only minimal CA, going any higher will result in soft, CA’ed results.
3) Move the camera back and forth slightly if you need to lock in your focus properly, but don’t always assume that it will be off; it’s often accurate.
4) Be prepared to stop down quite a bit; the depth of field is very, very, shallow.
Design:
There’s not a lot that you can do wrong in terms of design when it comes to a lens filter, and the Vivitar filters are no exception. I do have some comments on how the filters could have been better designed, but it is important to note that this is just nit-picking. One of the many lessons that I have learnt so far in my short time as a blogger is this: it’s far easier to criticize a finished product than it is to actually create a product by oneself. I am not criticizing any of the knowledgable and helpful commenters here- you guys are smart and offer insightful thoughts that help me become a better writer, and I commment on other sites myself, but it is definitely eye opening to see how hard it is to make the sausage… but I digress yet again, so back to the lens filter. It was a little difficult to differentiate between the different lens filters, so my two reccomendations relate to an improvement towards this end. I would have liked to see the diopter values displayed more distinctly on the filter, perhaps a more distinct coloring of white lettering on the black of the ring, or something similar. Additionally, I noticed that when the threads are fully tightened, the lettering on the filters do not match up. Aligning the letters would have made referencing easier, and it also would have sat better with my OCD mindset… just kidding (kind of). I need to emphasize that these are mere nitpicks, and you can see the quality of the product from the depths that I had to plumb to find criticisms. This, then, brings us to our
Conclusion:
The Vivitar macro lens filter is a fantastic value, and it would even be a great value at double or triple its price. It has excellent optics, a handy carrying case, and filter stacking with these is a workable approach. The only real reservation I have regards the lack of machining on the ribbing of the rings, but as long as you are cognizant of that, you should be golden, and still have some change to spare.
Value: 90% -The quality and performance are astonishing at this price point, but be careful with the ribbing at the edge of the ring. The case is a nice touch.
Performance: 95% – In the context of this price point, the IQ is amazing, and the stacking problems are not really considered when the price is accounted for.
Build Quality: 95% -The parts of made of the right materials, and the industrial design does not leave room for any looseness or give.
Verdict: If you are on a budget, and you want to shoot macro, this is an excellent proposition.