Topaz launched the new Photo AI 2.0 (get a $40 discount now)


Get the new Topaz Photo Ai with a $40 discount (Click here).
This is the intro:
And here the improvements:
Adjust Lighting and Balance Color
Photo AI 2 introduces two new filters to help you quickly create a neutral lighting and color baseline. You can use them either together or separately:
- Adjust Lighting improves lighting and addresses over/underexposure in a visually pleasing way. It can deal simultaneously with extreme highlights or shadows in the same image.
- Balance Color attempts to remove color casts, then allows you to adjust relative temperature based on the neutral baseline. It can generally handle multiple light and color sources simultaneously.

Keeping in line with the overall Photo AI product philosophy, these filters aim to be more “corrective” than “creative”. While we assume you will apply more creative effects later, there are several situations where Adjust Lighting and Balance Color will be highly useful:
Develop the highest-quality raw images

You can now get maximum quality out of your raw files by using the combined tools in Photo AI 2: Adjust Lighting (new) to fix underexposure and improve default “flat” raw colors, Balance Color (new) to quickly correct straight-out-of-camera color shift, and Raw Remove Noise (improved – see below) to extract the maximum detail out of your raw file.
Correct underexposed or backlit images

Underexposed images and backlit subjects generally require manual work and selective adjustments to correct properly. Adjust Lighting corrects severe lighting issues and maintains the overall tonal balance of the image without requiring the use of masks.
Neutralize strong color casts

Correcting color casts with traditional tools requires a lot of manual effort and often leads to unnatural results. Balance Color understands the contents of your image to create substantially better results with a single slider.
Current technical limitations
We’re aware of several existing technical limitations that we’re addressing in the next month:
- Adjust Lighting and Balance Color may not work as expected with dng exports. (Other export types should be fine.)
- Both filters currently operate on the output of the Raw Remove Noise model, which means that they do not take advantage of the full dynamic range of the raw format. This may lead to suboptimal results in images with extreme shadows or highlights.
- If you have other filters enabled, editing Lighting or Color parameters will be slow since the other filters must run first. Also, we have a significant performance optimization for Balance Color lined up for next week’s release.
- Adjust Lighting and Balance Color are currently excluded from Autopilot. We may add it into the Preferences when we better understand how you use it.
Please give us your feedback 1 on Adjust Lighting and Balance Color so we know where to improve the feature. We’d also love to see your examples of both good and bad results.
Significantly improved raw processing and noise removal

Photo AI 2 includes an all-new raw noise reduction model that better removes strong noise and preserves more detail. Autopilot will also now base parameter estimations on both your image’s contents and detected ISO.
- RAW Normal v2: for normal raw images at native ISO. Stay with this option unless you’re shooting at extremely high ISO settings.
- RAW Strong v2: for extended ISO images. Select this option when your camera simulates a higher ISO by boosting exposure and applying in-camera noise reduction.
In internal blind testing, the new Raw Remove Noise v2 model offers vastly superior results for high-ISO images than any other denoiser we’ve tested (including Lightroom, DxO, and our own v1). We encourage you to try it on your own images, but here’s a CR3 sample file 2 (63MB) if you’d like to see the difference:

Additionally, in v1.5.2 we updated the raw pipeline to fix occasional aliasing, color fringing, and grid artifacts, which makes a big difference on some images. For example, here’s the difference on an image affected by aliasing at 400% zoom:

This higher-quality Raw Remove Noise will only be enabled if you directly import a raw image into Photo AI (not a tiff):
- In the Photo AI standalone: directly open your raw file (CR3, NEF, ARW, DNG, etc.) and Photo AI will automatically use the raw model.
- From Lightroom Classic: select your original raw file and launch Photo AI from File → Plug-In Extras. (Selecting Edit In → Photo AI will edit a tiff copy instead.)
The model name includes “RAW” if you’re using this higher-quality model. We recommend you import raw files directly into Photo AI to create the highest-quality conversion.
Sharpen Standard v2
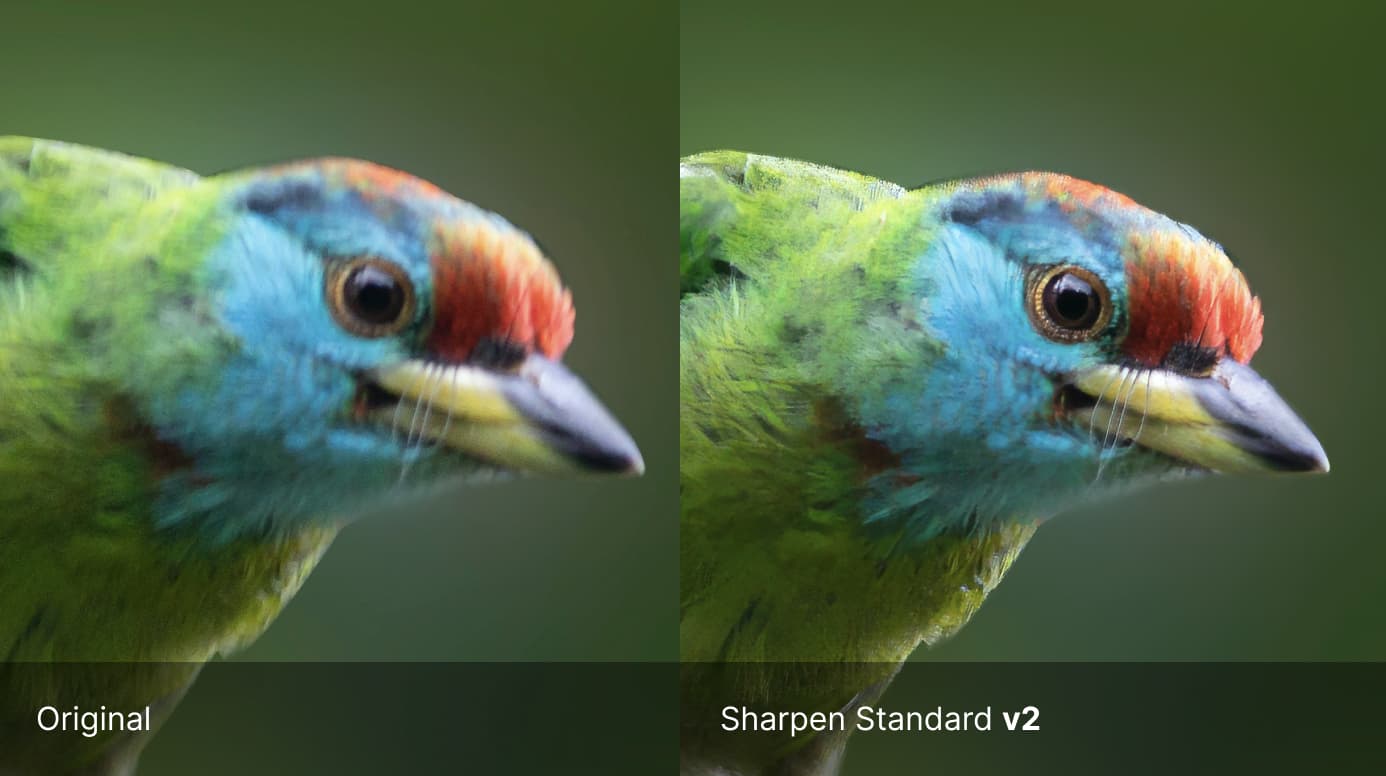
Photo AI 2 includes a substantial upgrade to the Standard sharpening AI model that offers more natural detail recovery, fewer artifacts, and increased slider sensitivity. In internal blind quality testing, Standard v2 outperformed Standard v1 on test images by a factor of 4.47x.
Use this model for small-to-medium amounts of blur; we have an upcoming upgrade to the Sharpen Strong model for very blurry images. (Discussion here. 6)
New Autopilot Preferences

You can now customize almost every aspect of Autopilot:
- Specify default batch upscaling options by using longest/shortest edge in pixels, inches, or centimeters.
- Set Remove Noise and Sharpen activation thresholds and logic for determining which models to use.
- Give Autopilot guidance on general model strength to prefer when activating filters.
- Selectively enable or disable slower features like Face and Subject Detection.
- If you wish, you can now fully deactivate Autopilot by disabling each feature. You can then import images and manually enable the features you want without waiting for auto-detection.
While the default Autopilot settings will work well for most cases, you can become substantially more efficient by tailoring it to your workflow. After disabling an Autopilot feature, you can always enable it per image by selecting the appropriate feature in the right panel.
Upscale from Photoshop

Previously, accessing Photo AI from the Photoshop Filters menu would not allow you to upscale. Now, you can select File → Automate → Topaz Photo AI to use the upscaling models directly within Photoshop.
The Automate plugin will:
- Change the canvas size to your desired image size
- Create a new Photo AI layer with your upscaled results
Toggle the visibility of the new layer to see the results of upscaling. You can also still use the existing Filters plugin alongside the new Automate plugin if you don’t need to upscale.
Other improvements
A substantial amount of the work since August’s roadmap update 3 has gone into the features above (and a few yet to come). However, we’ve also fixed many smaller visual and performance issues:
- Subject Only toggle is now disabled when there is no subject
- Parameters on non-Autopilot selected filters should no longer reset automatically
- Installer now downloads model files for all available devices
- Fixed crashes and poor performance on NVIDIA A-series GPUs
- Improved performance of welcome screen by caching recent files’ thumbnails
- Right panel remembers scroll position and uncollapsed filters after running autopilot
- Fixed some Sony images having incorrect orientation
- Fixed PS plugin not working on Mac if installing to a different drive
- Fixed resolution appearing as infinity if the file’s resolution is 0
- Many smaller user interface improvements